Setting up SSL certificates for Proxmox can feel like a headache, but it doesn’t have to be.
You can set it up in under 10 minutes using a domain registered on AWS Route 53. In this post I’ll show you how to get proxmox.naz.com to redirect to your Proxmox host, with SSL enabled. I’ll also show you how to get your hosted services working under subdomains like adguard.naz.com and plex.naz.com.
All without opening any firewall ports or exposing your network to the internet.
Quick guide
If you want explanations for what each step is doing, see the end of this post. If you just want to get it working quickly, then follow along:
Setup Route 53
- Log in to the AWS console and go to Route 53 Hosted Zones
- Select the zone for your domain. In this example I’ll refer to
naz.com - Click ‘Create record’ and create a new record with the following info:
- ‘Record name’ should be
proxmoxor whatever you want to refer to your host as. This will be accessed atproxmox.naz.com - Record type should be
A - The value should be your private IP address to the proxmox host server: e.g.
192.168.1.100 - Set TTL to
60for now (useful if you make any mistakes) - Click ‘Create records’
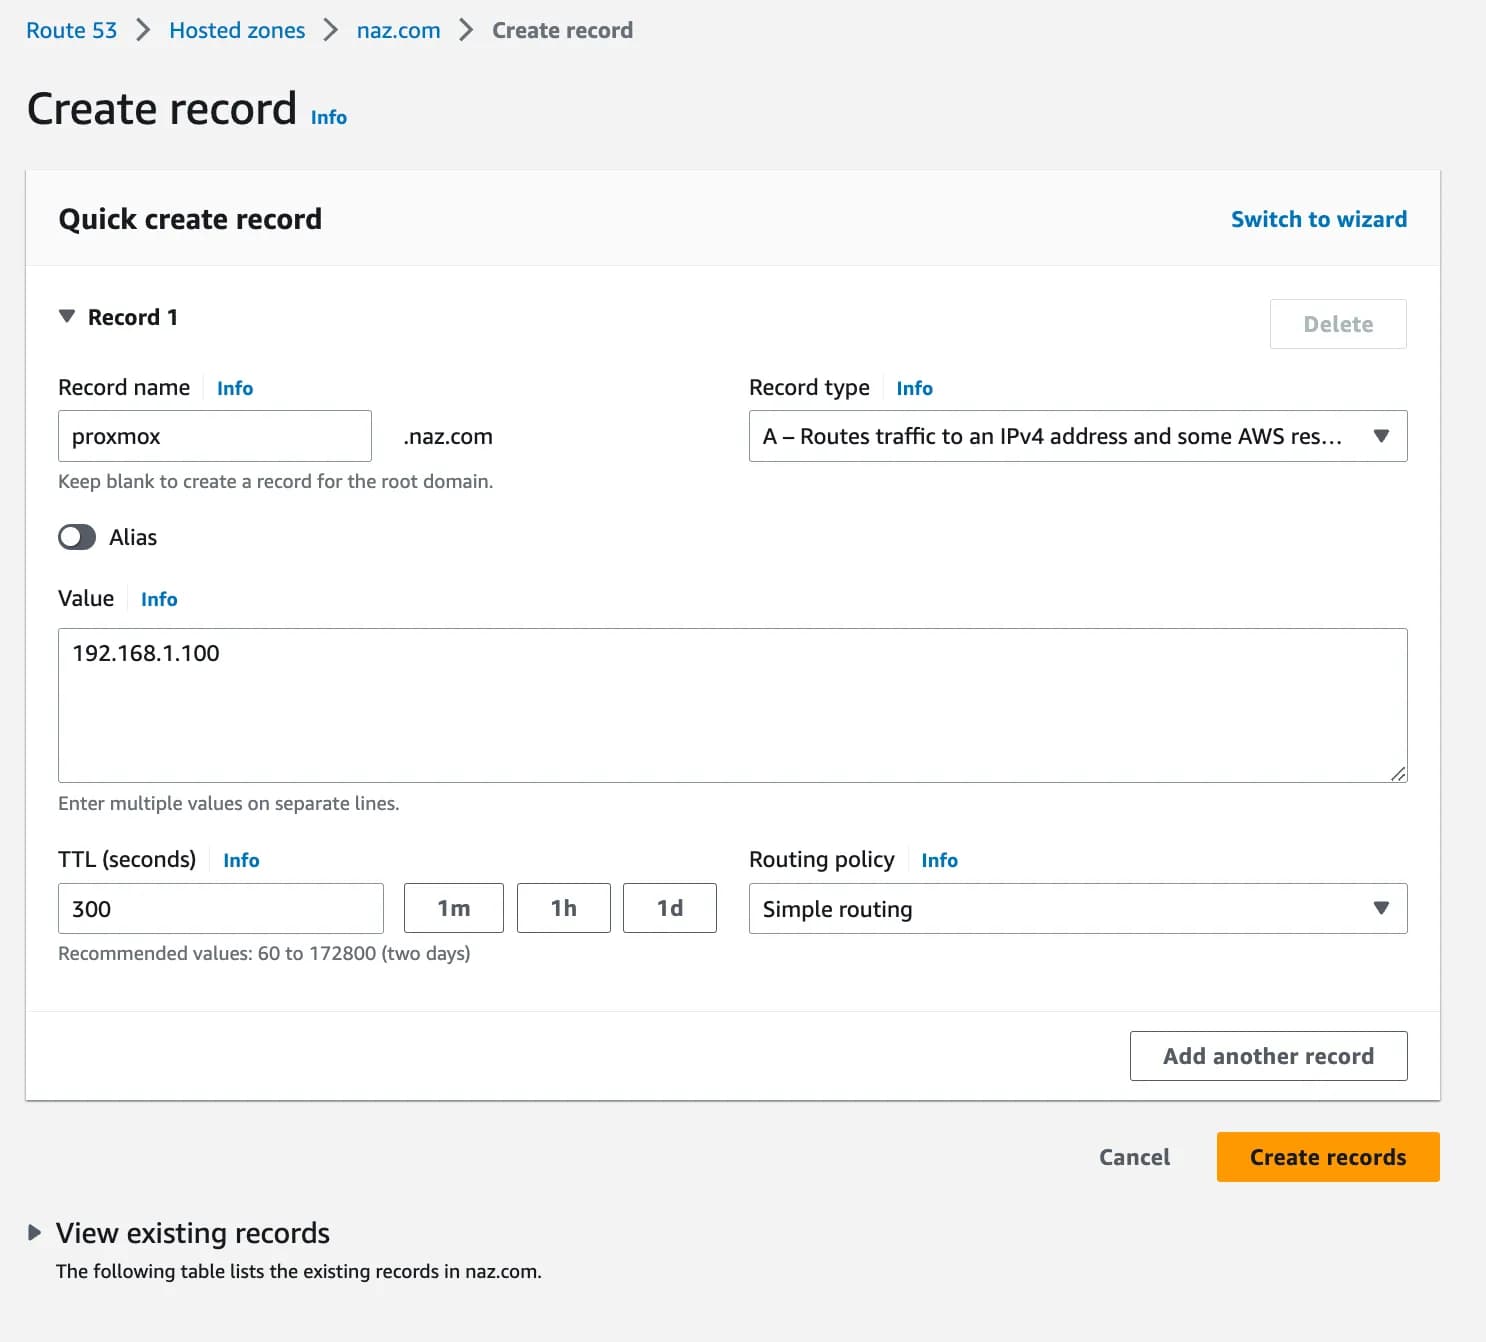
- ‘Record name’ should be
- Once that’s done, click ‘Hosted zone details’ at the top and then copy your ‘Hosted zone ID’ to a text file. You’ll need it for the next step.
Setup AWS Permissions
- Log in to the AWS IAM console and click ‘Users’ on the left.
- Then click ‘Add users’.
- Give the user a name, e.g. ‘proxmox’ and click ‘Next’.
- Select ‘Attach policies directly’ and then click ‘Create policy’. This should open a new window.
- Click ‘JSON’ and paste the following, remembering to replace
XXXXXXXXXXXXXXXXwith the zone ID you copied earlier:
{
  "Version": "2012-10-17",
  "Id": "proxmox-letsencrypt",
  "Statement": [
    {
      "Effect": "Allow",
      "Action": ["route53:ListHostedZones", "route53:GetChange"],
      "Resource": ["*"]
    },
    {
      "Effect": "Allow",
      "Action": [
        "route53:ChangeResourceRecordSets",
        "route53:ListResourceRecordSets"
      ],
      "Resource": ["arn:aws:route53:::hostedzone/XXXXXXXXXXXXXXXX"]
    }
  ]
}- The click ‘Next’ and give it a name, e.g.
proxmox-route53and click ‘create policy’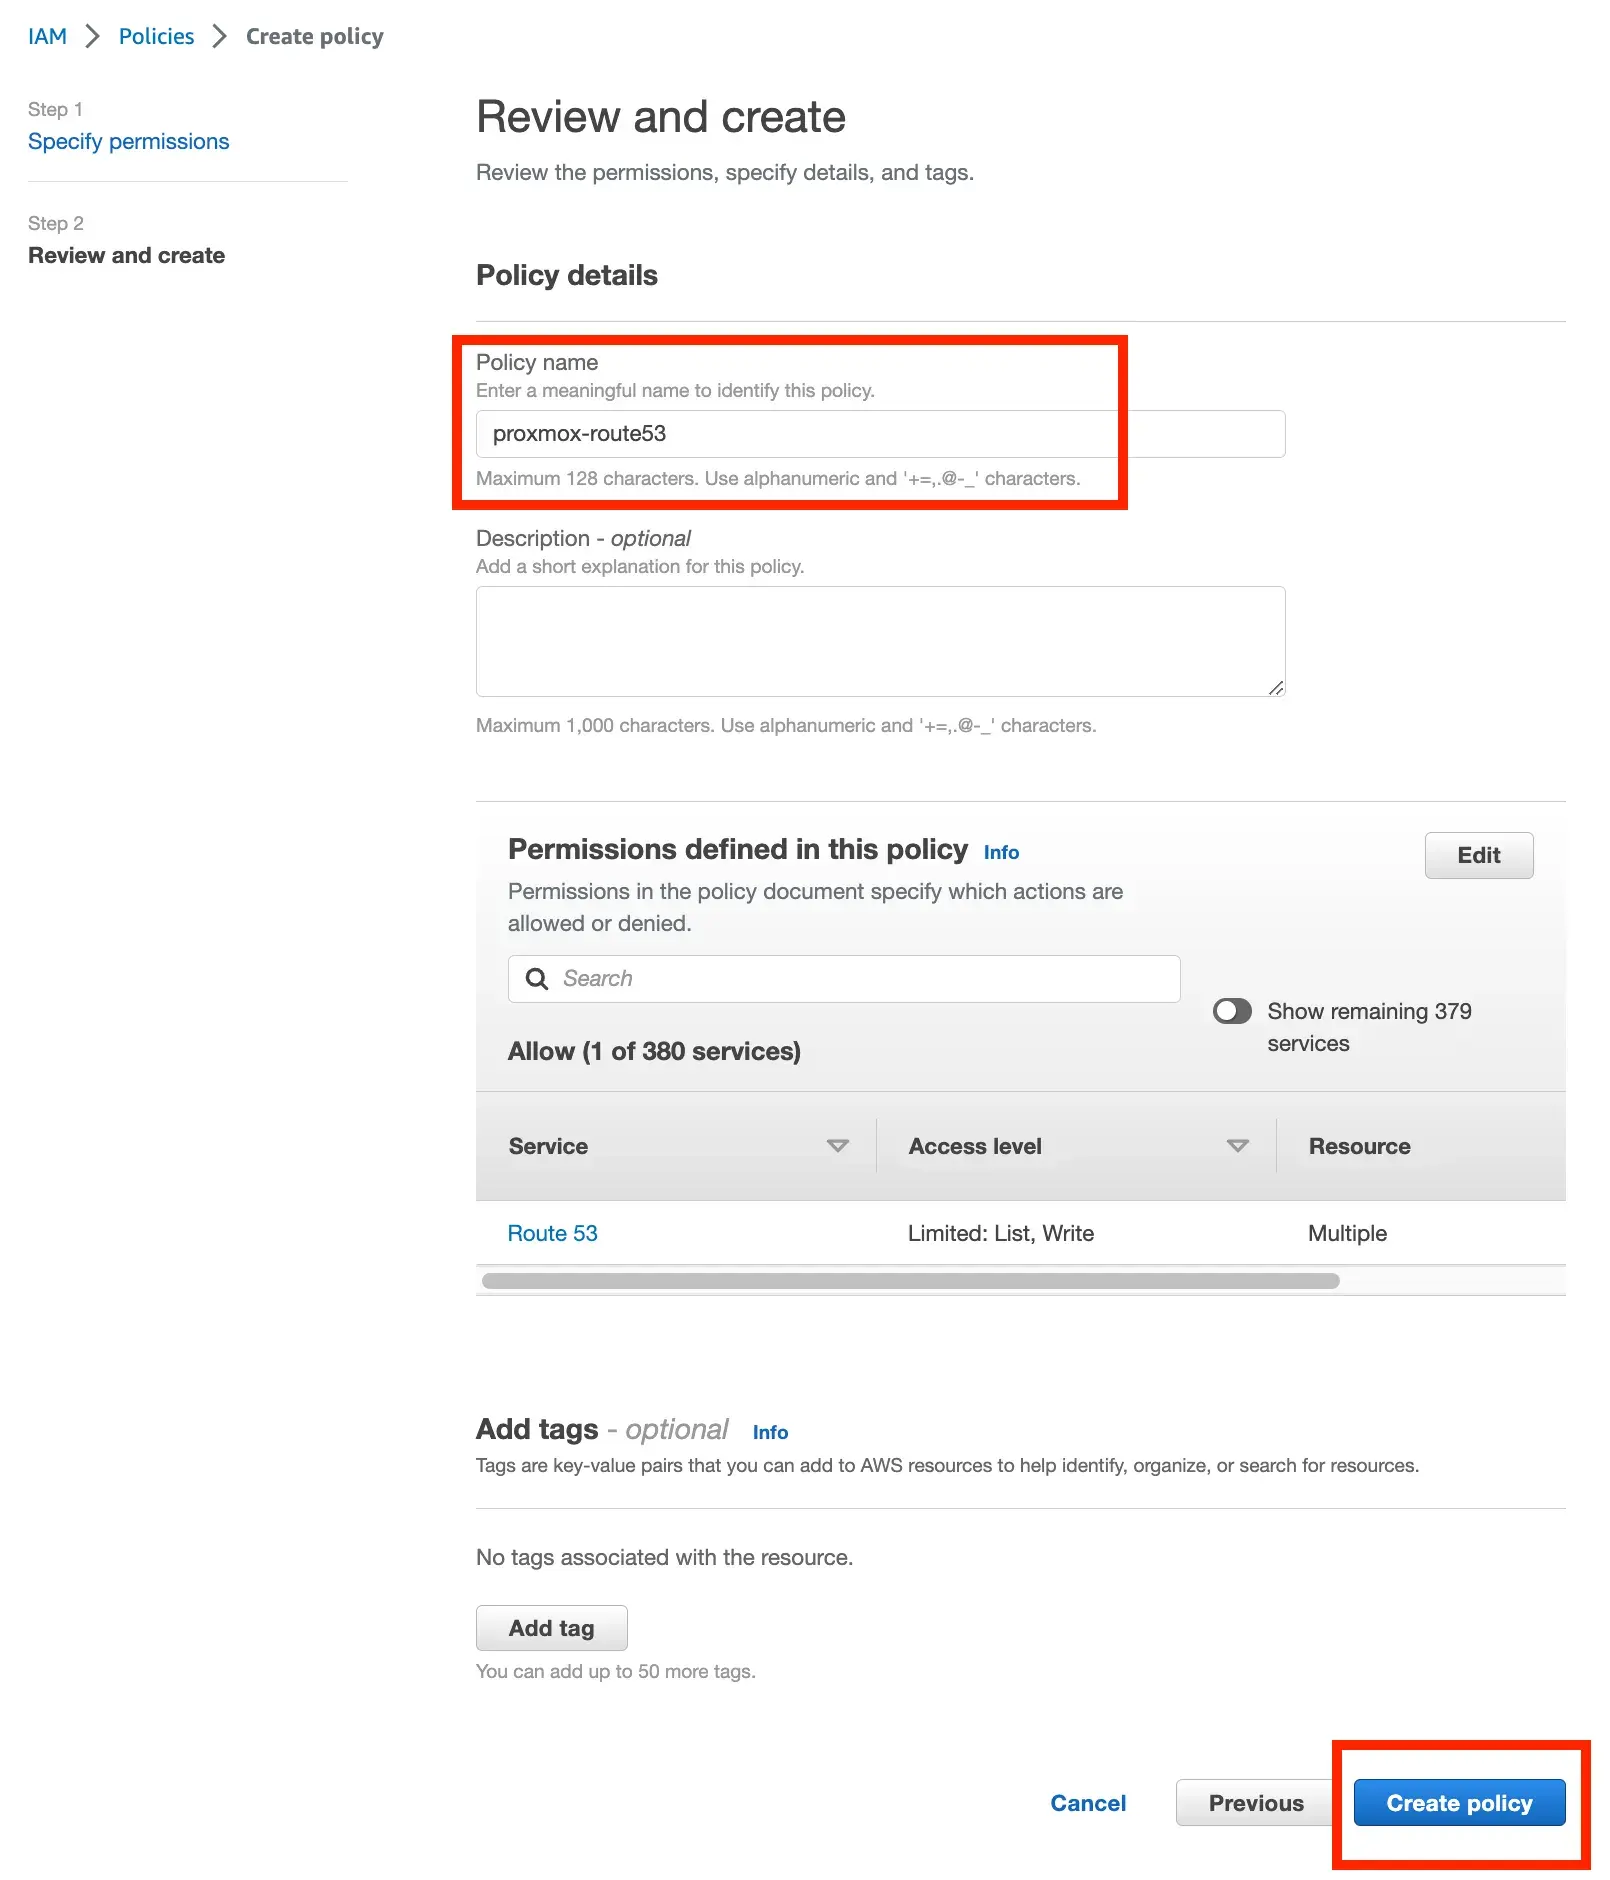
- Close this window and go back to the previous one where you were creating the user. Click the refresh button and then search for the policy. Then select it and click ‘Next’.
- No need to change anything on the next page. Just click ‘Create user’
- Select the new user you just created (e.g.
proxmox) and then click on ‘Security credentials’. - Scroll down to ‘Access keys’ and click ‘Create access key’. Select ‘Application running outside AWS’ and then click Next.
- Set the description tag value to
proxmox-host-keyand click ‘create’. - On the next page copy both the Access key and the Secret access key to a text file. You’ll need these later. Note that you will not be able to see the secret access key again. If you forget to copy it, delete this key and repeat steps 10 and 11 again.
Setup Proxmox
- Log in to your proxmox host then click on ‘Datacenter’ in the top left and ‘ACME’ in the menu.
- Under ‘Accounts’ click ‘Add’. Put
defaultas the account name (anything works), then add your email, select Let’s Encrypt V2 as the ACME directory and accept the TOS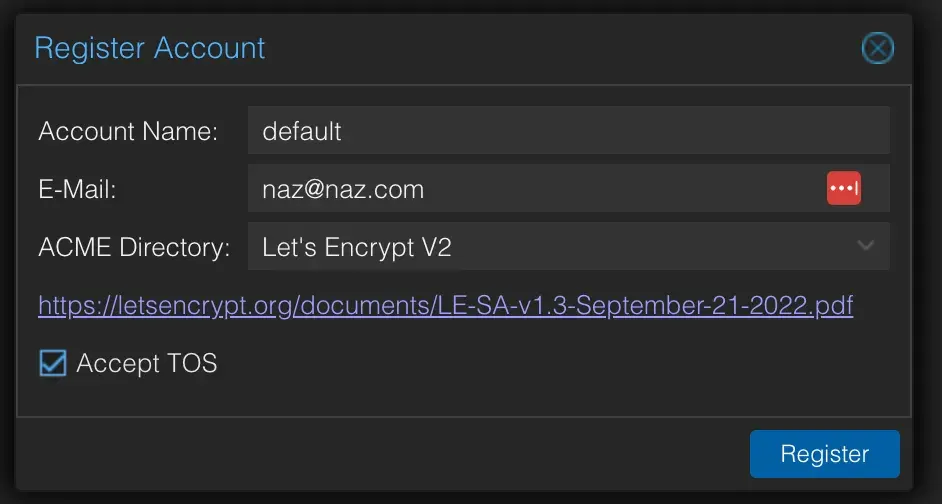
- Then under ‘Challenge Plugins’ click ‘Add’ and type
dns-01as the Plugin ID, setAmazon Route53 (AWS)as the DNS API and put in your AWS key id and secret access key you copied earlier.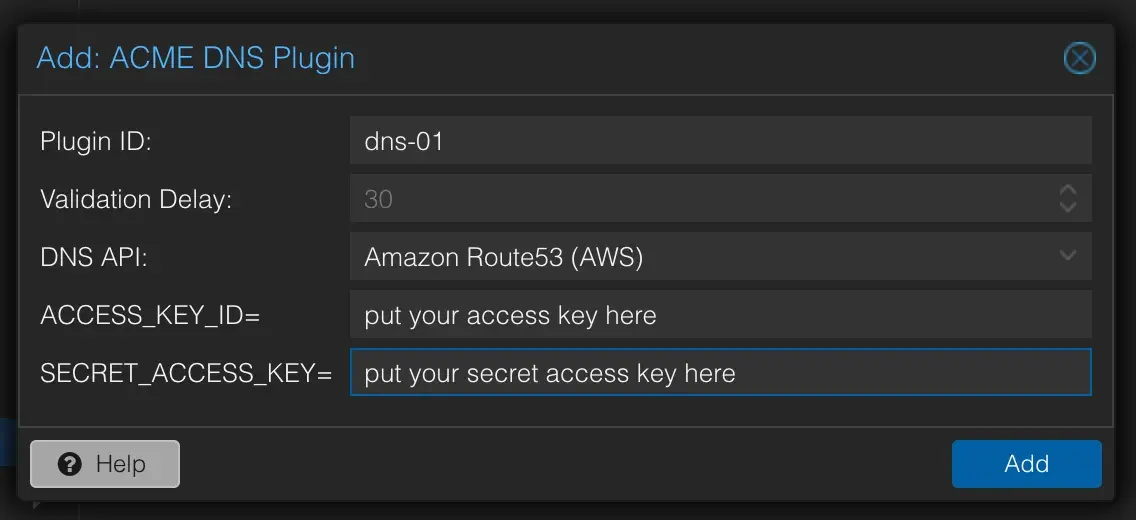
- Then click on your Proxmox Node in the far left menu and select System > Certificates in the right menu. Under ACME click ‘Add’
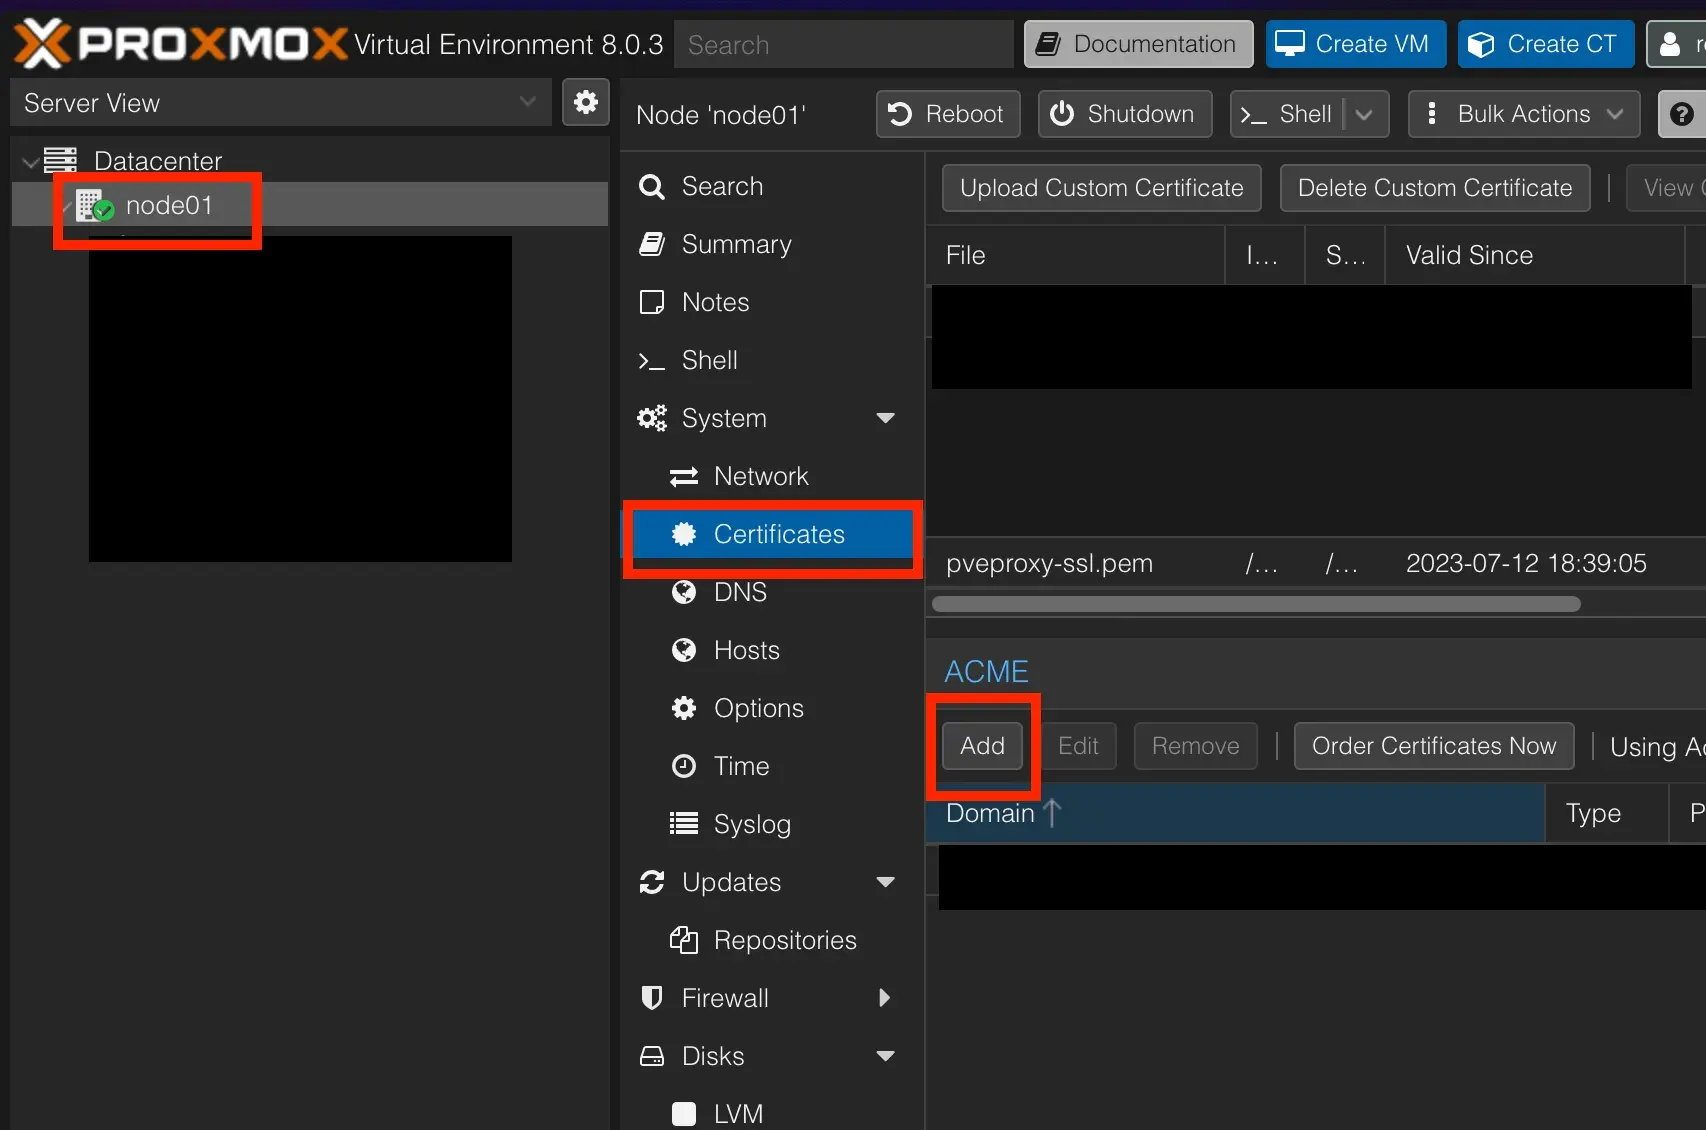
- Change the Challenge Type to
DNS, selectdns-01as the plugin and type in the domain your want to use for your proxmox host (e.g.proxmox.naz.com) and click Create.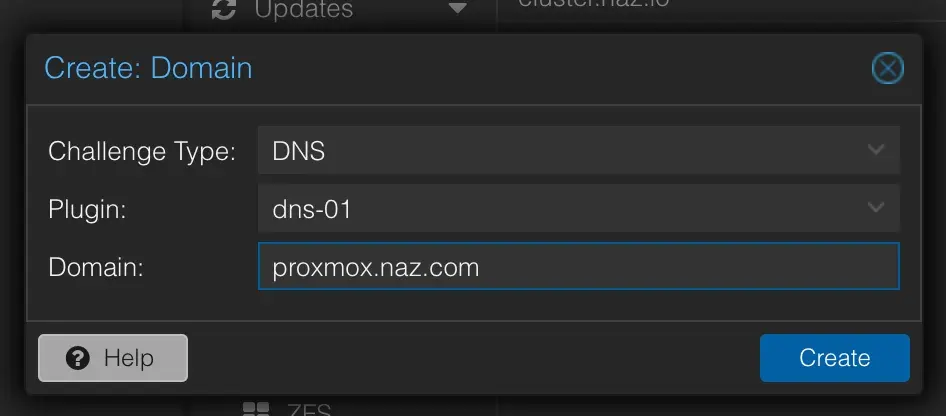
- Once that is done click ‘Order Certificates Now’ and it should obtain an SSL certificate and apply it on your Proxmox host!
- (Optional extra): If you want to be able to type
proxmox.naz.comwithout the:8006at the end, follow the steps in the extras section further below. - You should now be able to login to your proxmox host using the domain
proxmox.naz.com:8006instead of your local IP address.
If you only care about a domain name for the host, you can stop here.
If you want to create domain names for each of your hosted services (e.g. plex.naz.com) as well then follow the next steps.
Installing SSL certificates for locally hosted services
In this section I’ll show you how to set up domains for locally hosted services.
Again, this is without opening your network to the internet or exposing any ports on your router. In order to make it work we need to install Nginx, a reverse proxy. This is a piece of software that will map the domain names to the local services along with making them accessible on port 80 so you can type plex.naz.com instead of plex.naz.com:32400.
It sounds more difficult and long-winded than it is, so let’s jump in.
Setup NGINX
- Install
Nginx Proxy Manager. This can be done with a single command by opening the Shell on your Proxmox host and then pasting this:
bash -c "$(wget -qLO - https://github.com/tteck/Proxmox/raw/main/ct/nginxproxymanager.sh)"- Select ‘Yes’ to proceed (press enter to select) and then when it asks ‘Use default settings’ select ‘Advanced’.
- Keep pressing enter until you get to ‘Choose Distribution’ then select ‘Debian’ and press spacebar then enter.
- Select ‘Bookworm’ as the version.
- Select ‘Unprivileged’ as the Type.
- Set a root password for ssh access.
- Set anything as the container ID (I used
301) - Leave the hostname as
nginxproxymanager - Leave the disk size at 4 gb.
- Leave 1 as the number of CPU cores.
- Leave 1024 as the RAM.
- Set your bridge (mine is
vmbr0) - Then type in your desired static IP address and netmask. The IP can be anything in the valid range. The netmask must be correct (typically
/24if your don’t know). Here I set my IP to192.168.1.8:
- Set the correct gateway IP address (typically your router’s IP address):

- Disable IPv6 unless you’re using it.
- Leave MTU size blank.
- Leave DNS Search Domain blank.
- If you’re using a DNS server for local domains you can set it now (I left it blank as my router managers my DNS servers).
- Leave MAC address blank.
- Leave VLAN blank.
- Select ‘No’ for ‘Enable Root SSH access’.
- Select ‘No’ for Verbose mode.
- Select ‘Yes’ to create the LXC
- You should see the installer running which will look something like this:
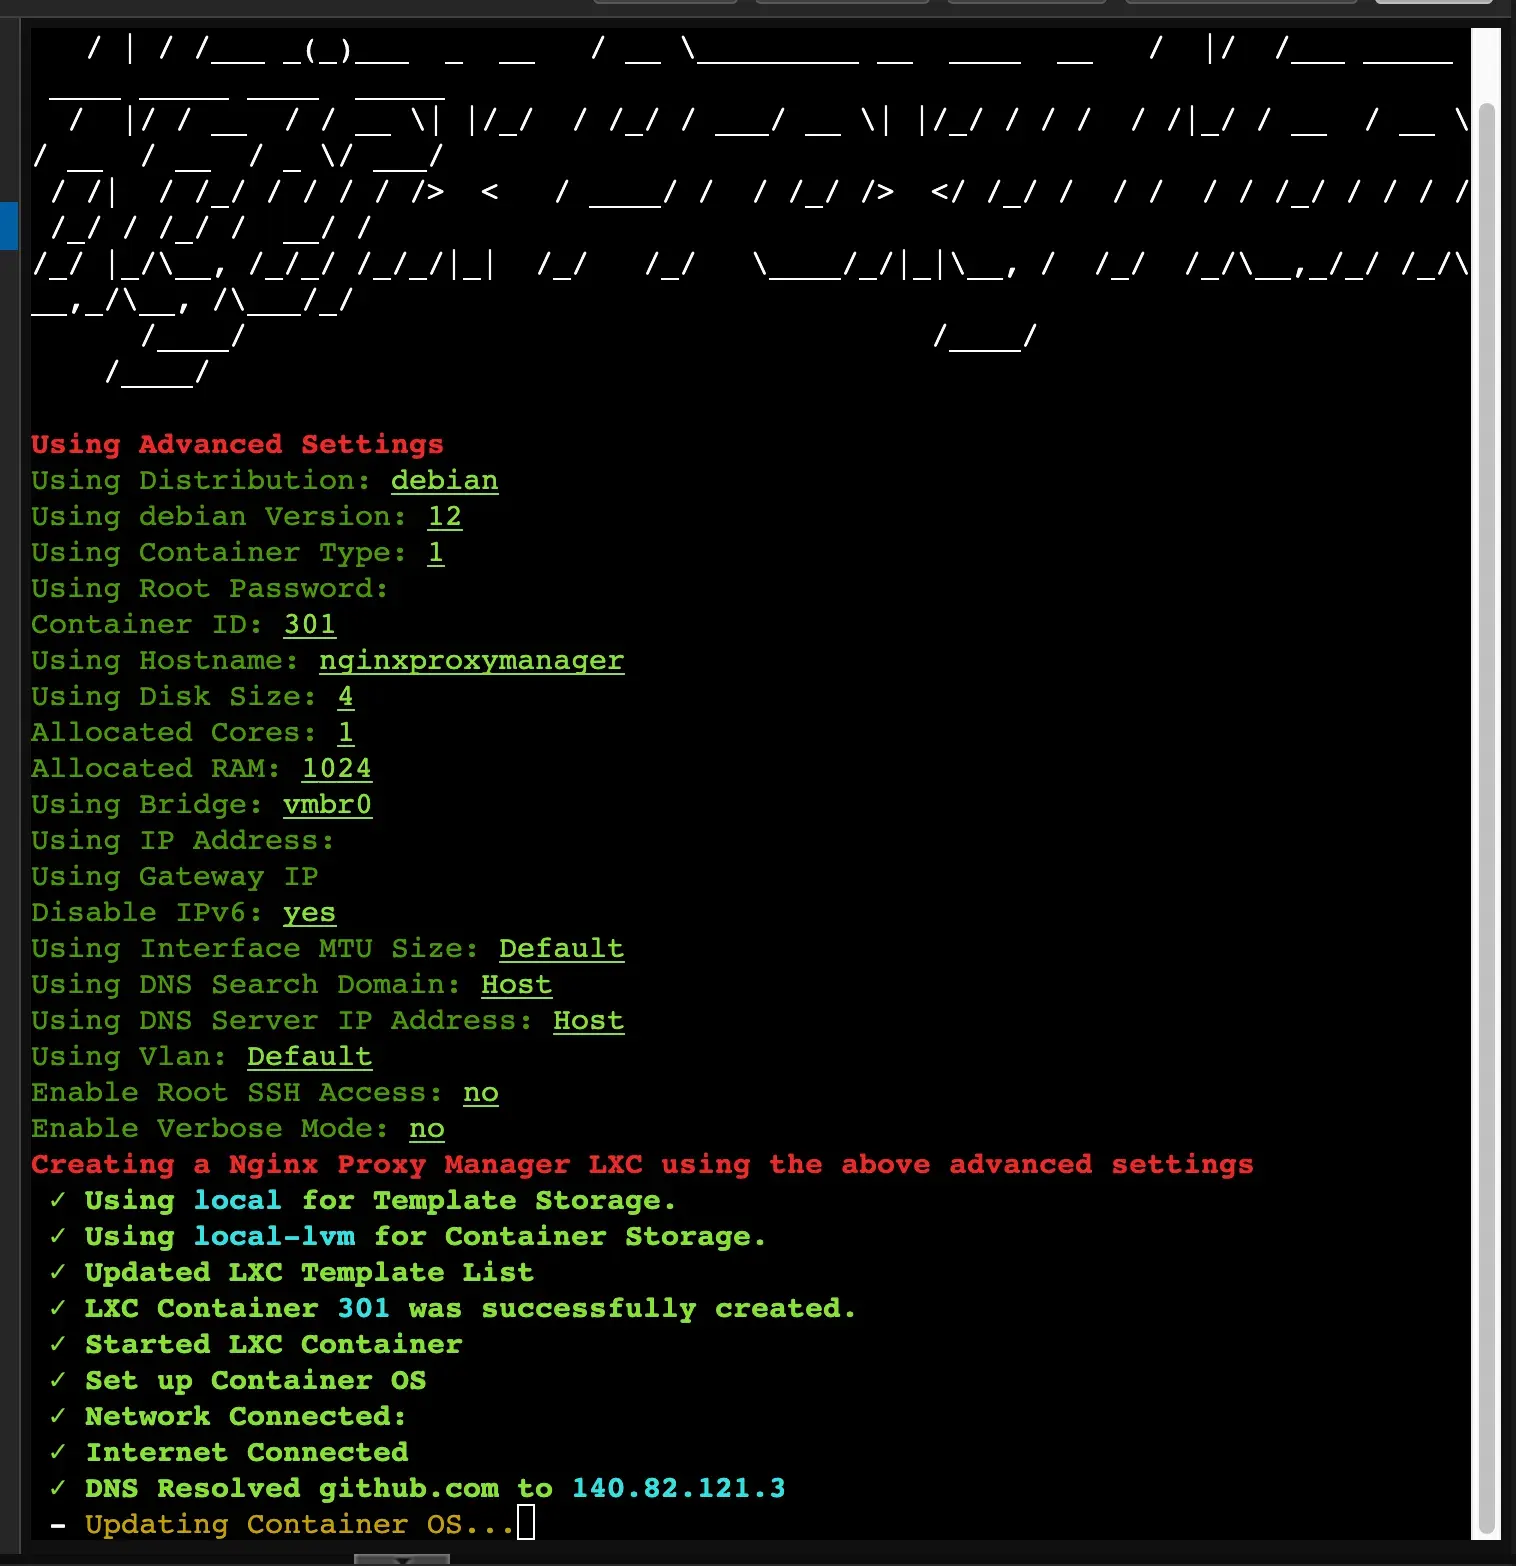
While this is running, let’s add an extra Route53 domain name for the subdomains. This will point at the NGINX instance we’re setting up.
Point Route53 at NGINX
- Log back into the Route53 console and select your hosted zone.
- Under records click ‘Create Record’.
- Put
*as the Record Name and the IP of the NGINX service (e.g.192.168.1.8) as the Value. Set TTL to60and the record type toAas you did before and click “Create Records”. - We’re done creating the DNS records. In order to proceed we need to wait until these records have propagated. You can test it by typing
dig +short '*.naz.com'in any terminal (either on a proxmox VM, the host, or your own machine). If it returns the IP you set in step 3 then you’re good to go. If it is blank then wait 5 minutes and try again - DNS records can take some time to propagate across the internet.
Setup NGINX to automatically obtain SSL certificates
- Navigate in your browser to
http://192.168.1.8:81(replace the IP with the static one you set when setting up nginx). You can also copy it from the Proxmox shell where you ran the install command. - Log in with the default email address
admin@example.comand the passwordchangeme - Set a new login (remember the email address) and password.
- When you’re logged in click on ‘SSL Certificates’ and then ‘Add SSL Certificate’
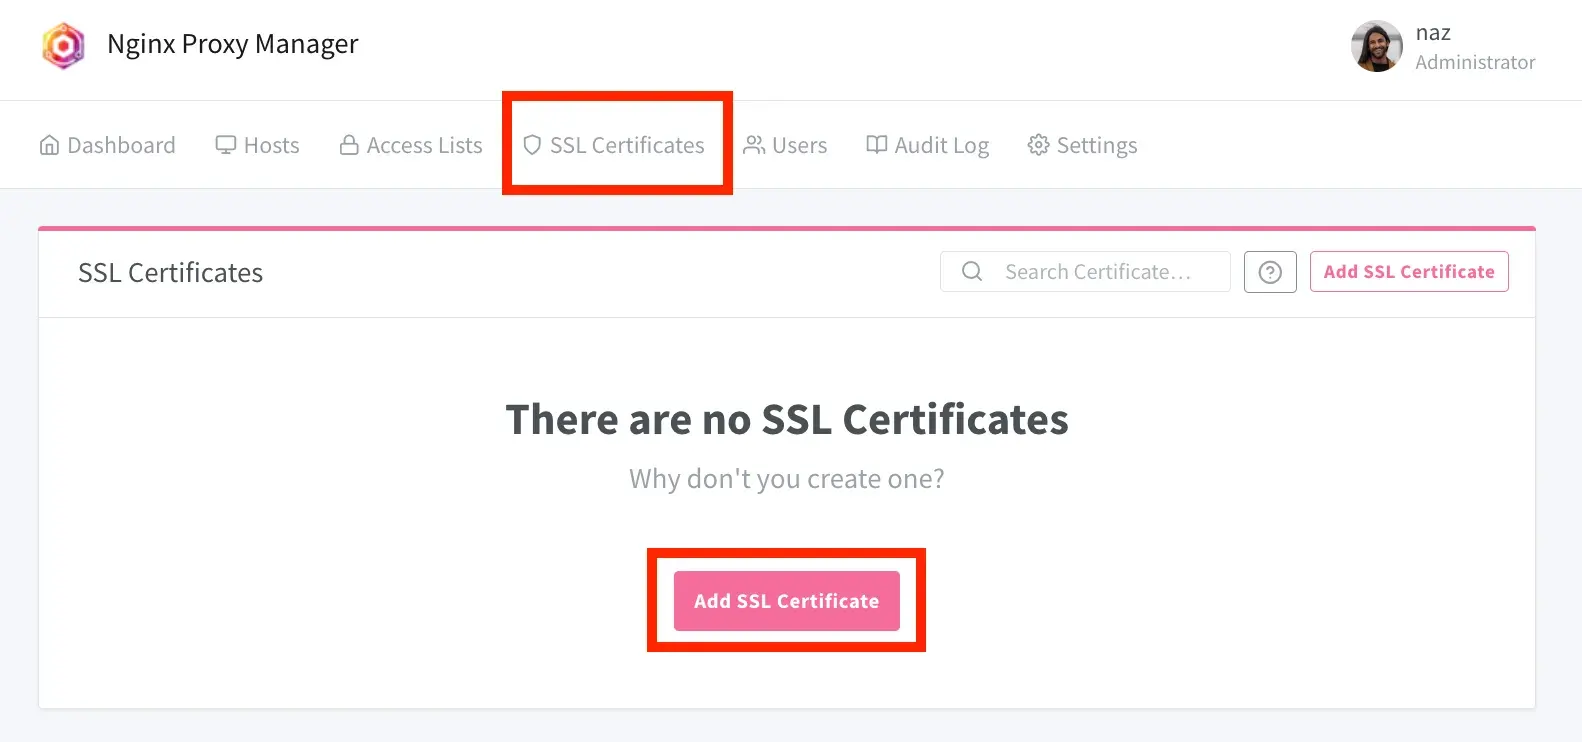
- Enter
*.naz.com(replace the domain with yours but keep the*) as the domain name and press enter. Then enter your email address and select ‘Use a DNS challenge’ - Select
Route 53 (Amazon)as the DNS provider and copy and paste the AWS key id and AWS secret key from earlier. - Leave propagation seconds blank and select ‘I agree to the terms.’ Then click ‘Save’.
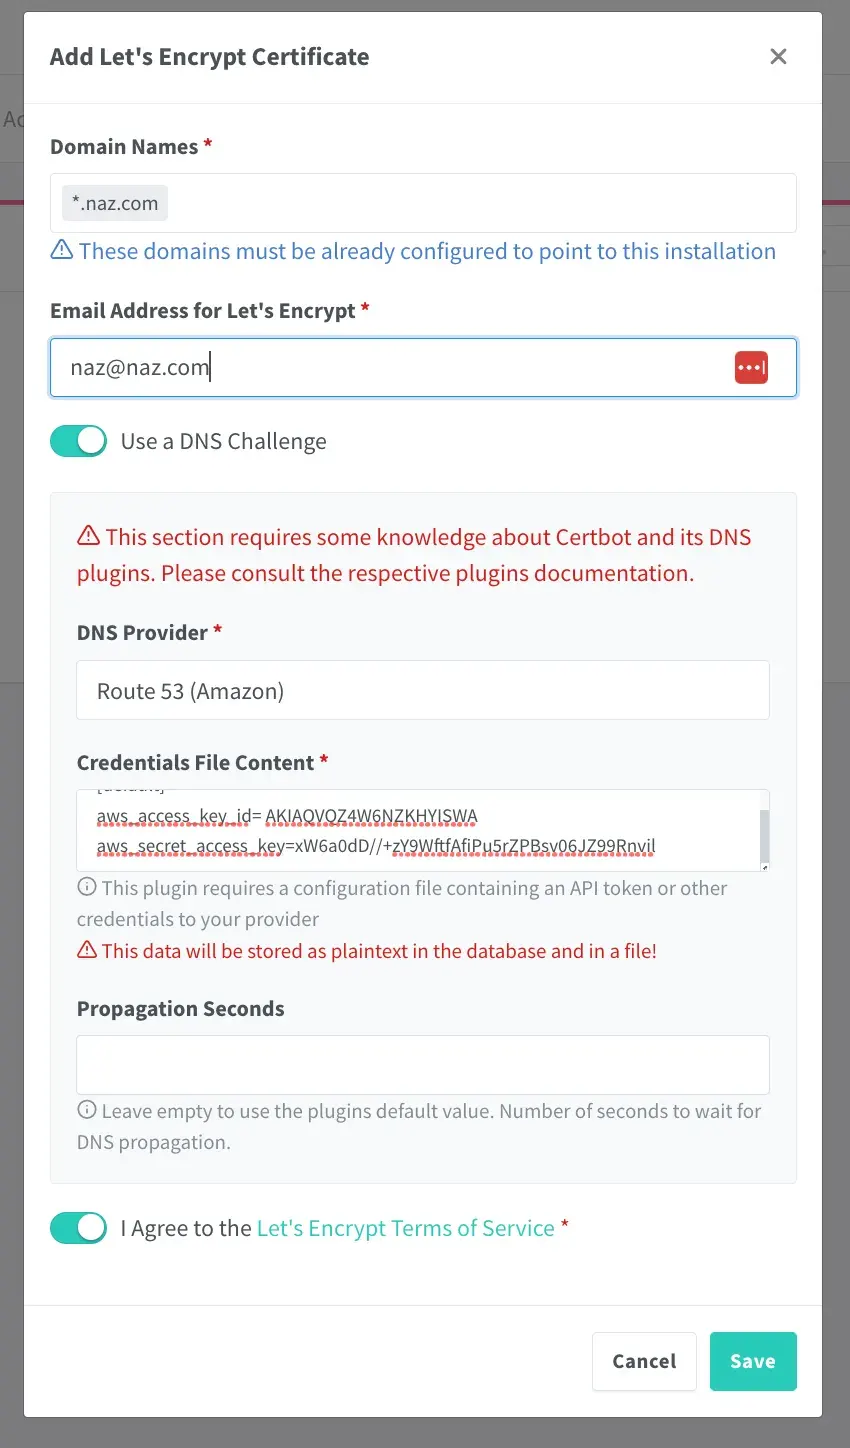
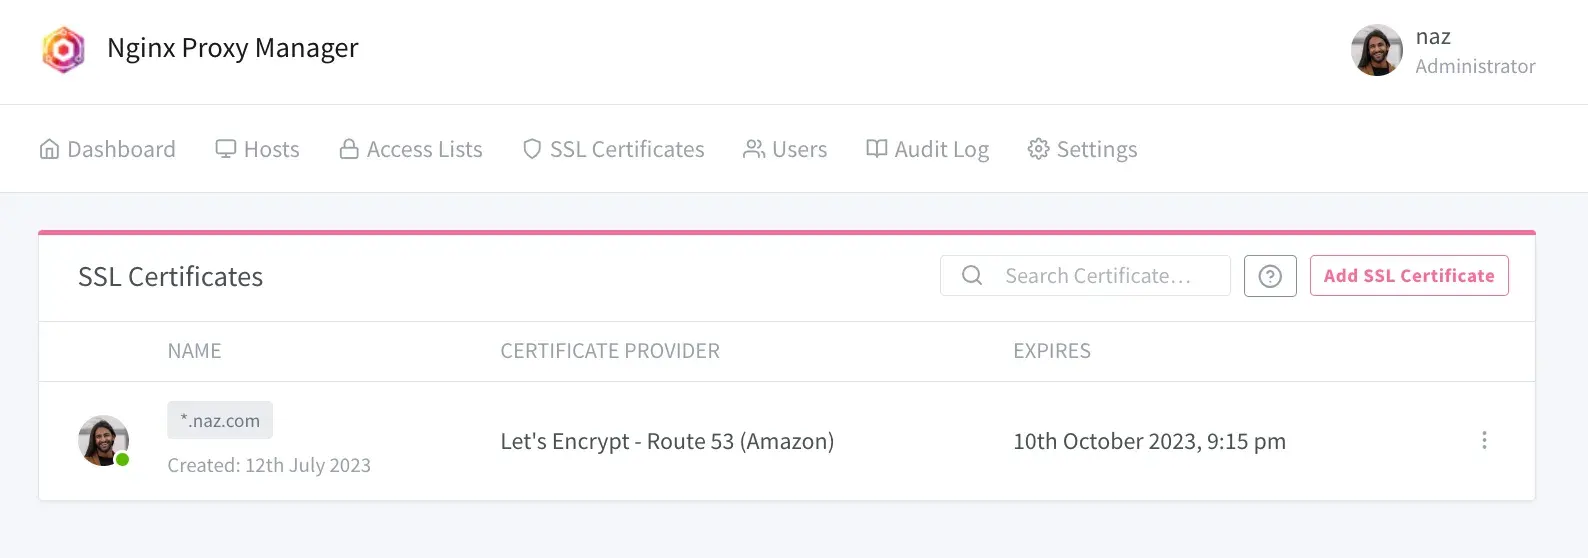
- You’ll now get a loading screen for a few minutes whilst the SSL certificates are obtained. When it’s complete you should see this:
Adding subdomains for each service
We’ll now set up subdomain routing for your hosted services.
In this example I’ll show how to set up a domain for the nginx proxy manager we just installed.
It works similarly for other services so you can repeat these steps as many times as you need.
- Go to the nginx proxy manager dashboard and click ‘Hosts’, then ‘Proxy Hosts’ and then ‘Add Proxy Host’
- Set the domain name you desire, ensuring it’s a subdomain of the wildcard domain you set earlier. e.g. if you set up
*.naz.comyou can use any subdomain such asnginx.naz.comorwebserver.naz.com - Set the local IP of the server and the port it uses (e.g.
81fornginxor32400forplex). Usually you want to leave the Scheme ashttpbut for some SSL-enabled services it needs to behttps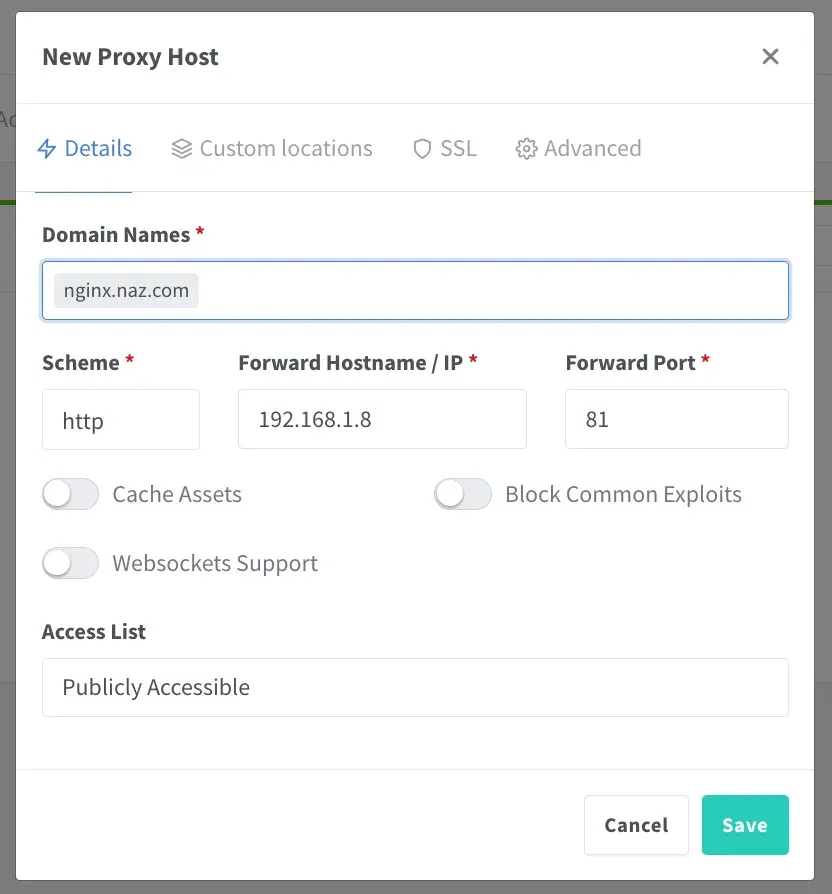
- Then click ‘SSL’ and under ‘SSL certificate’ select the SSL certificate you just obtained (usually the last option)
- Then click ‘Force SSL’ and ‘HTTP/2 Support’
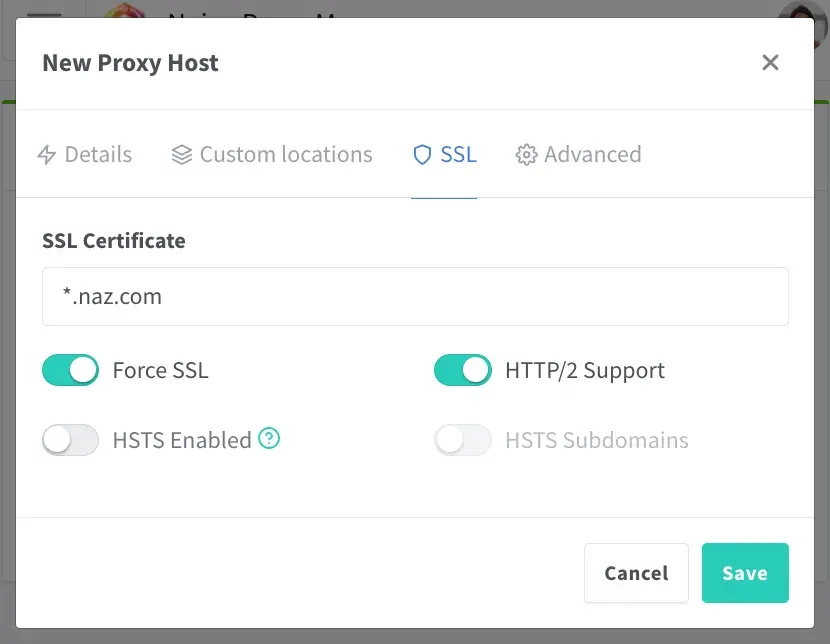
- Click ‘Save’
- You should now be able to access the management console from
nginx.naz.com(or whatever you set it to), without having to add:81to the URL
Everything is now set up and you can access the service via a domain name with a valid SSL certificate set.
You can repeat the ‘Adding subdomains’ steps above to make other services available on different domains. With this setup you can use any subdomain under the wildcard domain you set earlier. You do not need to change anything in Route 53 again.
Congratulations!
FAQ
How can I access the Proxmox host without having to put :8006 as the port?
Follow this amazing video guide to route port 8006 connections to port 80.
How does it all actually work?
There are a few different things going on:
-
Domain name -> IP routing.
- The Route 53 DNS records are set so that when you type
proxmox.naz.comthe resolved address192.168.1.100
- The Route 53 DNS records are set so that when you type
-
SSL certificates
- A service called Let’s Encrypt is used to get signed certificates.
- In order to prove to Let’s Encrypt you control the domain, you have to add a special
TXTrecord to the DNS config. Let’s Encrypt then verifies this and issues the SSL certificates. - For the
proxmox.naz.comdomain this is handled by the Proxmox ACME service. For the service subdomains it is handled by Nginx proxy Manager. - This is why we need to create a new AWS user with Route 53 permissions. The
TXTrecords are typically removed after validation (they only last a few minutes) so you won’t typically see them in Route 53. - The
TXTrecords need to be refreshed every 3 months to renew the SSL certificates, so the permissions for Nginx and ACME need to remain. Both services will automatically refresh the certificates when needed. - Nginx Proxy Manager obtains a wildcard SSL certificate which means all subdomains under the domain registered are valid. This is why setting up routes with Nginx works.
-
Nginx Proxy Manager redirects domains to local ips & ports
- When setting up a proxy route in Nginx, we’re telling it to serve a specific local service (and port) at the requested domain name.
- e.g. When a user types
plex.naz.com, it will resolve to the IP for Nginx Proxy Manager (since all subdomains resolve to nginx). - Nginx then sees this request and knows that the user is looking for
plex.naz.com. If it has any rules set up for this domain, it knows to instead serve a local service, and which port to get it from. - If set up with ‘Force SSL’ as instructed it will tell the browser to use HTTPS instead and then use the valid wildcard certificate for TLS encryption.
Why can’t I use Nginx Proxy Manager to also serve the Proxmox host domain?
Whilst it’s possible to set this up, due to the way Nginx works it will break the ‘Console’ functionality of the Proxmox host (and perhaps other things).
In order to get it working smoothly the ACME service on the Proxmox host needs to obtain its own SSL certificate.
ACME isn’t able to service SSL certificates for local services so we need Nginx to do the routing.